Metrenq: Find your way in the Delhi Metro

I built this webapp a couple of weeks ago. It was a fun weekend project. I arrived at the idea when I was travelling in the Metro and was unable to find an app that would give me proper directions, like which train U needed to board, headed to which station, or if I had other route options etc. Or I would have to fire up data-hungry Google Maps when I had less data available and was on a slow connection.

Moreover, I was really fascinated by the idea of representing the complex Delhi Metro map, its stations and interchanges, in Javascript and utilising that data to find possible routes between two stations.

The app is available at http://thezillion.github.io/metrenq

The app does not have great aesthetics by the way.

How to

Just enter the boarding and deboarding stations and it will list the number of routes, ranking routes by number of stations, and also displaying number of interchanges for every route.

How I built it

The app is written completely in Javascript. The data is stored in JS objects and does not utilise any database. Though this increases the load time, the in-app processes are fast because it doesn’t need to run AJAX to load Python script data. The data is available at the frontend

I used jQuery and the awesome Select2 library.

Data objects

All data is stored in three JS objects: stations, lines, and ipoints.

Only the stations object and a part of the lines object are loaded from the server. The other three data objects are populated using the process_data function.

The stations object contains basic station data: the station name, lines it loes on, and station number. This number is the way of representing the station throughout the program.

The lines object contains line data: stations on each line in the correct order and also tells which line it intersects with, and at which station.

The ipoints object is a fast access object meant to list all the ipoints for every line.

Some terms

Ipoint: Short for intersectiom point, an ipoint is the station where two lines cross each other.

One-interchange relationship (OIR): Two stations are in an OIR if we can go from one to the other by interchanging only once.

Algorithm

The task is to find all possible routes between two points (stations) on the map. The stations may be:

  1. on the same line
  2. in an OIR
  3. connected through more than one interchange

The first two cases are simple. The third case is a bit complex. I’ll explain the algorithm using three examples signifying each of the three cases.

In the second case, I simply find a common interchange point for the two stations based on the lines of the two stations.

In the third case, I find the ipoints on the current station’s line(s) and recursively try to find an OIR between the ipoint and destination station. If an OIR is not found, I again find the ipoints for this station and repeat the process.

Plans

I’m still working on the app. I plan on making the displayed information more detailed, plus improving the aesthetics.

Hope you like it! http://thezillion.github.io/metrenq/

Delhi Metro Map

This is what the Delhi Metro map looks like. It’s still growing and getting denser.
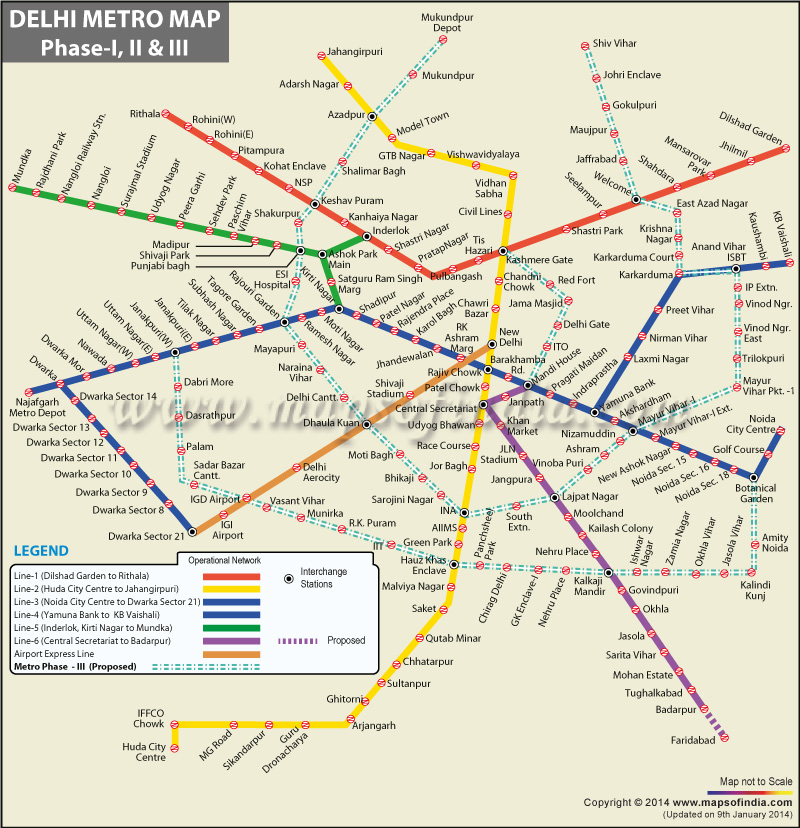
Delhi Metro Map

Long time no see

The last time I wrote on this blog, I was 16. I’m 18 now, and everything has changed. Long time indeed.

I was a just-started web developer back then, who loved learning new things, one who hated shortcuts a little too much, and someone who thought designing stuff was easy, the backend is God. The better-working something is, backend-wise, the more worthy it is. Back then, I won’t mind spending a whole day making something that would take fifteen minutes, had I used the right tools.

Two years in, I have learnt (and changed) a lot. Though I still believe that the purpose or motive, of a piece of software is important, my mindset towards the user interface design has changed for the better. I now believe that however hard you work on your app, it won’t appeal to an audience unless you design it really well. Who else do you built for, other than the users? And design doesn’t just mean using subtle colors, or eye-catching effects. It also includes arranging different elements in the right fashion and the most user-friendly way of doing things. Yes, design is how it works (Jobs).

And about hating shortcuts, I still believe in understanding the core basics of languages I use the most, I love knowing how things work, but I use (and create) libraries whenever I need them. To build something good as quickly as possible, you need to have the right tools in your arsenal. If you don’t use available tools to make your work better, it’s an abuse to the fellow developer who made it as well. So, use what you can. Developers from around the world who faced a similar situation like yours built something a while ago, and open-sourced it, so that you can solve your problems too. That’s pretty awesome. Use.

I now utilize a proper build system and workflow to build web apps. I can now build web apps in Nodejs, Python, PHP, Meteor (oh I love Meteor), Angular, et al, I use Grunt for running my tasks like JS linting and Uglifying code, Yeoman or Grunt-init for scaffolding, Git for version control, JS frameworks like jQuery, Dojo etc., and a whole lot of other tools to make my life simpler.

I recently installed Ubuntu, and I now use it as my primary working OS. Things are just a lot simpler now. Linux is meant for developers, after all. I love writing shell scripts, especially to simplify mundane work (I’ve written a couple of useful scripts to avoid writing too many Git commands after every small source change).

I’ll be going to college at MEC, Kochi, Kerala. I’ll be pursuing BTech in CS.

PS: In the past, I’ve written a lot of JS posts. Today, most of them are either under-developed or contain obsolete code. I’m planning to keep them, just to remind myself of how much has really changed.

Desco : core JS custom description maker

Exams over, I got quite some free time yesterday, and started coding some custom tooltip functionality and ended up making something that could make hovermenus, tooltips, descriptions, (and whatever you wanna use it for) much easier. The code was great fun and I was quite jubilant after completing it. I called it Desco. I can’t call it a tooltip because it can be used for many more purposes. Technically, a tooltip is something that follows the mouse position. But, this script positions the description in such a way that the center of the hovering element and the center of the description are in the same line.

Use it on your webpage

1. Put in the following HTML code in the <head> section of your webpage –

 <link rel='stylesheet' href='http://zillionhost.xtreemhost.com/desco/desco.thezillion.css' type='text/css' />
 <script src='http://zillionhost.xtreemhost.com/desco/desco.thezillion.js'></script>
 <script>
 win.onload = function(){
 desco.makeDesco();
 }
 </script>

Before using win.onload, make sure that no functions / code has been set for the body’s onload event. If that is so, include that code in the above function.

2. Set the classes of all elements for which you need to display a Desco as ‘show-desco’. To set the text that should be displayed in the desco, set the alt attribute of the element as the text. For example –

<div class='show-desco' alt='Desco text here.'></div>

Customisation

Desco also allows some customization that can be applied to the description. Include the customization code in the parenthesis of the makeDesco() code like this –

<script>
win.onload = function(){
desco.makeDesco({
property1: 'value1', // Don't forget the comma which should be there before putting a new property
property2: 'value2'
});

}
</script>

The following properties can be used for customization  –

1. shadow – Sets the box-shadow of the description. Value should be set in the way you write it in CSS3. Eg – shadow: ‘0 0 4px black’  Default is no shadow.

2. distance – Sets the distance of the description from the element in pixels. Value should be set as an integer. Eg – distance: 4  Default is 10.

3. location – Sets whether the description should be placed above or below the hovered element. Value should be ‘above’ or ‘below’. Eg – location: ‘above’  Default is ‘below’

4. softcorners – Sets the border-radius of the description. Value should be set in the way you write it in CSS3. Eg – softcorners: ‘6px’  Default is ‘6px’.

5. fontsize – Sets the font-size of the description text. Value should be set in the way you write it in CSS3. Eg – fontsize: ‘6px’  Default is ’12px’.

6. followmouse – Sets whether the description should follow the mouse or not. If this property is not set (or set to false), the description displays below the element in a centralized manner. Value should be either true or false (without quotes). The upward or downward arrow will be removed if this property is set to true. Eg – followmouse: true  Default is false.

Code

The positioning of the desco is done by applying some calculations to the element’s co-ordinates, height, width and some more determinants. The desco element’s co-ordinates are set according to it. The center of the description and the center of the hovered element are equidistant from the left end of the browser, which is aquired with awesome code. I’ll put in the complete code explanation in some time. Don’t have time right now. 😛

Here’s a demo – http://jsfiddle.net/thezillion/5geRt/

Hope you like it. Please send me your feedbacks, preferably here.

Javascript Draggable 2 (no jQuery)

I posted some time ago about a core JS implementation of draggable functionality.

My first post on JS draggable can be found here – thezillion.wordpress.com/2012/08/29/javascript-draggable-no-jquery

There, I made a div draggable by using some JS and appropriate CSS. And yeah, I named it TZDragg. The valuable feedbacks from users made me better the code to some extent, and make it more usable.

Firstly, I’ll talk about the functionality I added to TZDragg..

Many people told me that they they could not use the code with elements that were not positioned as absolute and whose co-ordinates were not preset. Eg. – if people want to make the list items enclosed in a <ul> tag draggable, they will have to set each list item positioned absolute and set its co-ordinates which is a very untidy way of doing it. So, I coded a function named is_element_having_set_coordinates(). It first checks if the desired element is positioned absolute. Then, it sets the top and left positions of the element according to its browser co-ordinates. This function is executed on the onmousedown event, enclose in the tzdragg.startMoving() function. This makes tzdragg highly useful.. Now, you can drag lists, divs around without ever setting the style attribute rules.

Many people also complained that, for the execution of the draggable functionality requires a lot of code-writing. Also, including the onmousedown and onmouseup events in the HTML has become a very n00by way. I coded a function that helps the users to implement the code simply in the following way –

In the <head> section, create a <script> tag, and code the following lines in it –

win.onload = function(){
 tzdragg.drag('elem1, elem2, ..... elemn');
 // ^ IDs of the draggable elements separated by a comma.
 }

That’s quit simple.. Oh, and yes, I uploaded the JS file here – https://raw.github.com/thezillion/tzdragg/master/source/tzdragg.js

You can embed the JS file in your webpage using the <script> tag.. I hope it works well. Please send me your feedbacks, preferably here.

JavaScript Draggable (no jQuery)

Well, the thing is, I hate jQuery. Not that I hate the language syntax or the way it does things. But, as a Javascript programmer, I feel that jQuery is stuff for beginners, and not even beginners, for people who want stuff to be done fast and without much effort (or knowledge). People who want to excel in web development should learn to code their own JS, without relying on jQuery, or, for that matter, any JavaScript library. Using libraries ruins your possibility of being able to code good JS. You learn to do things when you do everything yourself. For me, coding my own core JS gives me much more satisfaction than using some library. Well, I shouldn’t make this post too long. Let’s get to the matter. I’ll post about why I hate jQuery some time later.

The program uses concepts like Mouse Positioning, onmouseover and simple style rules like top and left. I called it TZDragg (Yeah!).

The first thing we need to do is make a div that is positioned absolute (so that we can set the top and left rules). Some additional rules are also applied so that it is convenient to use. Here we do it –

<style>
 #elem{
 position: absolute;
 width: 100px;
 height: 100px;
 background-color: black;
 -webkit-user-select: none;
 -moz-user-select: none;
 -o-user-select: none;
 -ms-user-select: none;
 -khtml-user-select: none;     
 user-select: none;
 cursor: default;
 }
</style>

Now that we have the div, let’s code the JS.

<script>
 // Coded by TheZillion [thezillion.wordpress.com]
 function $(el){
 return document.getElementById(el); // To make the code simpler by shortening document.getElementById - [http://bit.ly/QS3wE8]
 }
 var tzdragg = function(){ // To make the code cooler. TZDragg. Cool name!
 return {
 // Here we start of with the main functions
 startMoving : function(evt){ // The function that sets up the div coordinates to make it move. Executed on the onmousedown event on the div.
 evt = evt || window.event;
 var posX = evt.clientX, // The x-coordinate of the mouse pointer position on the screen
 posY = evt.clientY, // The y-coordinate of the mouse pointer position on the screen
 a = $('elem'), // Points to the div element
 divTop = a.style.top, // We need the initial position of the div so that we can determine its final position on dragging
 divLeft = a.style.left; // We need the initial position of the div so that we can determine its final position on dragging
 divTop = divTop.replace('px',''); // Just so that we can perform calculations on the variable.
 divLeft = divLeft.replace('px',''); // Just so that we can perform calculations on the variable.
 var diffX = posX - divLeft, // We keep this value so that we can calculate the final position of the element
 diffY = posY - divTop; // We keep this value so that we can calculate the final position of the element
 document.onmousemove = function(evt){ // Whenever the mouse moves, this function is execulted
 evt = evt || window.event;
 var posX = evt.clientX, // Mouse x-coordinate
 posY = evt.clientY, // Mouse y-coordinate
 aX = posX - diffX, // The final x-coordinate of the element
 aY = posY - diffY; // The final y-coordinate of the element
 tzdragg.move('elem',aX,aY); // Function to assign the style rules to the element
 }
 },
 stopMoving : function(){ // This function gets executed when the user leaves the div alone. Changed the value of the onmousemove attribute.
 document.onmousemove = function(){}
 },
 move : function(divid,xpos,ypos){ // Function to assign the style rules to the element
 var a = $(divid);
 $(divid).style.left = xpos + 'px';
 $(divid).style.top = ypos + 'px';
 }
 }
 }();
 </script>

Then finally, the div element with its events –

<div id='elem' onmousedown='tzdragg.startMoving(event);' onmouseup='tzdragg.stopMoving();' style='top: 10px; left: 10px;' ></div>

Here’s a demo – jsfiddle.net/thezillion/Qx44z

Here’s the whole code –

<!doctype html>
<html>
 <head>
 <title>
 TZDragg
 </title>
 <style>
 #elem{
 position: absolute;
 width: 100px;
 height: 100px;
 background-color: black;
 -webkit-user-select: none;
 -moz-user-select: none;
 -ms-user-select: none;
 -khtml-user-select: none;
 user-select: none;
 cursor: default;
 }
 </style>
 <script>
 // Coded by TheZillion [thezillion.wordpress.com]
 function $(el){
 return document.getElementById(el); // To make the code simpler by shortening document.getElementById - [http://bit.ly/QS3wE8]
 }
 var tzdragg = function(){ // To make the code cooler. TZDragg. Cool name!
 return {
 // Here we start of with the main functions
 startMoving : function(evt){ // The function that sets up the div coordinates to make it move. Executed on the onmousedown event on the div.
 evt = evt || window.event;
 var posX = evt.clientX, // The x-coordinate of the mouse pointer position on the screen
 posY = evt.clientY, // The y-coordinate of the mouse pointer position on the screen
 a = $('elem'), // Points to the div element
 divTop = a.style.top, // We need the initial position of the div so that we can determine its final position on dragging
 divLeft = a.style.left; // We need the initial position of the div so that we can determine its final position on dragging
 divTop = divTop.replace('px',''); // Just so that we can perform calculations on the variable.
 divLeft = divLeft.replace('px',''); // Just so that we can perform calculations on the variable.
 var diffX = posX - divLeft, // We keep this value so that we can calculate the final position of the element
 diffY = posY - divTop; // We keep this value so that we can calculate the final position of the element
 document.onmousemove = function(evt){ // Whenever the mouse moves, this function is execulted
 evt = evt || window.event;
 var posX = evt.clientX, // Mouse x-coordinate
 posY = evt.clientY, // Mouse y-coordinate
 aX = posX - diffX, // The final x-coordinate of the element
 aY = posY - diffY; // The final y-coordinate of the element
 tzdragg.move('elem',aX,aY); // Function to assign the style rules to the element
 }
 },
 stopMoving : function(){ // This function gets executed when the user leaves the div alone. Changed the value of the onmousemove attribute.
 document.onmousemove = function(){}
 },
 move : function(divid,xpos,ypos){ // Function to assign the style rules to the element
 var a = $(divid);
 $(divid).style.left = xpos + 'px';
 $(divid).style.top = ypos + 'px';
 }
 }
 }();
 </script>
 </head>
 <body>
 <div id='elem' onmousedown='tzdragg.startMoving(event);' onmouseup='tzdragg.stopMoving();' style='top: 10px; left: 10px;' ></div>
 </body>
</html>

Shortening document.getElementById

You must be really fed up when you need to use document.getElementById() again and again in your JS code. jQuery provides a good variant by letting you use $(el). But, if you don’t wanna use jQuery, here is a method you can use to ease out you code by simplifying document.getElementById(), document.getElementsByName(), document.getElementsByTagName() or document.getElementByClassName().

All you need to so is make a function like this.

function getId(elm){return document.getElementById(elm);}

That was it! Now, you can use just getId() instead of document.getElementById(). Exempli gratia –

getId(‘id-of-some-element’).innerHTML = ‘This is awesome!’;

^ The above code changes the innerHTML of the element to ‘This is awesome!’.

Similarly, you can make functions like getName(), getClass() or getTag() to simplify other selectors. You can even use cool function names like $(), so that it looks like $(‘id-of-some-element’), just like jQuery does it!

Summer in code

It’s been long since I have blogged.

I played with a lot of code this summer. While most of my works are on the go to becoming startups, I also did some passtime code work. Here is a list of the ones that interested me the most –

1. Shrink – It is a lite URL shortener, that has damn simple style, and is rich in functionality. Shortens URLs fast with on-the-page shortening, stats, QR code generation, auto further redirection and more. Read the Features section for more details. Make an account and get the URL listing feature.

2. WordIt – A JavaScript app that displays character-related stats.

3. Tiper – Tiper is a Javascript based web app that types out the text input.

4. Inliner – Inliner is a web app that arranges your text input into one single line.

5. Reverzer – Reverzer is a web app that reverses your text input.

JavaScript Search

Last week, I encountered a need to be able to show search results based on a list on the web page, and I developed the following code to achieve it.

First of all I had a list with id “bever” –

<ul id="bever">
<li>Coffee</li>
<li>Tea</li>
<li>Milk</li>
</ul>

The following is the JavaScript :

function search(q,e){
q = q.toLowerCase();
var key;
if (window.event){key = window.event.keyCode;}
else{key = e.which;}
if (key == 13){
var a = bever.getElementsByTagName('li');
document.getElementById('results').innerHTML = "<h3>Search Results :</h3><ul>"; // Clearing the previous contents of the Search Results holder and adding the relevant new stuff
var b = a.length; // Take the total number of resources to search in
var i;
for (i=0; i<b; i++){
var c = a[i].innerText;
c = c.toLowerCase();
if (c.indexOf(q) >= 0){
document.getElementById('results').innerHTML += "<li>" + c + "</li>";
}
}
document.getElementById('results').innerHTML += "</ul>";
}
}

The complete HTML would look like :

<!doctype html>
<html>
<head>
<script>
function search(q,e){
q = q.toLowerCase();
var key;
if (window.event){key = window.event.keyCode;}
else{key = e.which;}
if (key == 13){
var a = bever.getElementsByTagName('li');
document.getElementById('results').innerHTML = "<h3>Search Results :</h3><ul>"; // Clearing the previous contents of the Search Results holder and adding the relevant new stuff
var b = a.length; // Take the total number of resources to search in
var i;
for (i=0; i<b; i++){
var c = a[i].innerText;
c = c.toLowerCase();
if (c.indexOf(q) >= 0){
document.getElementById('results').innerHTML += "<li>" +
a[i].innerText
 + "</li>";
}
}
document.getElementById('results').innerHTML += "</ul>";
}
}
</script>
</head>
<body>
<label>Search For : </label><input type="text" onkeyup="search(this.value,event);" />
<div id="results" style="border:1px solid black;"></div>
<ul id="bever">
<li>Coffee</li>
<li>Tea</li>
<li>Milk</li>
</ul>
</body
</html>

The above code will display the search results once you type in the keyword (or part of it) and press Enter. An instant search feature could be made by the following JavaScript. But, mind you, this could be take a little more time especially if the list is large.

function search(q,e){
q = q.toLowerCase();
var a = bever.getElementsByTagName('li');
document.getElementById('results').innerHTML = "<h3>Search Results :</h3><ul>";
var b = a.length; 
var i;
for (i=0; i<b; i++){
var c = a[i].innerText;
c = c.toLowerCase();
if (c.indexOf(q) >= 0){
document.getElementById('results').innerHTML += "<li>" + a[i].innerText + "</li>";
}
}
document.getElementById('results').innerHTML += "</ul>";
}

JavaScript Typing Effect

Well, I was kind of out-of-subject, so I thought of blogging on a simple, damn simple JavaScript program which shows up a typing effect.

After coding it, I just looked up some other methods of doing it. But, all of them took more than twenty lines of code. Mine takes up a measly 6-10 lines of code.

The Program uses a simple timing function, with a variable which is incremented every time the function is called. A function is timed and the timing is placed inside the same function, so that it gets called consecutively.

Let me show you how –

<html>
<head>
<title>Typing Effect - by Zillion</title>
<script type='text/javascript'>
var index = 0;
var text = 'Lorem ipsum dolor sit amet, consectetur adipiscing elit. Pellentesque tincidunt, nulla at tempus tristique, nisl leo molestie est, ut vestibulum mauris mauris a odio. Sed at massa vitae ipsum venenatis porta. Integer iaculis pretium tempus. Donec viverra sollicitudin velit non gravida. Phasellus sit amet tortor odio. Vivamus lectus nisl, suscipit porttitor bibendum ut, tristique quis dui. Vestibulum non eros leo. Maecenas tincidunt semper turpis, a tristique purus pretium sit amet. Praesent nec neque tortor.Donec suscipit tristique ante quis molestie. Phasellus ac lacus non felis faucibus dictum vitae ac ipsum. Sed pharetra nulla sodales nulla porta imperdiet. Quisque pretium hendrerit laoreet.';
// Here you can put in the text you want to make it type.
function type()
{
document.getElementById('screen').innerHTML += text.charAt(index);
index += 1;
var t = setTimeout('type()',100);
// The time taken for each character here is 100ms. You can change it if you want.
}
</script>
</head>
<body onload='type()'>
<!-- And here, you create the container in which you display the typed text -->
<div id='screen'></div>
</body>
</html>

I also found out that this could be used to show HTML being typed out. Try this out with text='<html><h1>This typing effect is just great.</h1></html>’ or any other HTML code. This works with HTML and the browser does not show the executed code, because the browser tries to interpret HTML as one block, as a whole. But since this HTML code snippet is just added character-by-character, the code does not get executed.